Showing posts with label cucumber-jvm. Show all posts

Friday, June 9, 2017

Changing logcat buffer size in Android devices ... almost works

My (debug-build of) app under test logs extra information about test execution to system logs which is accessible via logcat on Android devices. This is very powerful as now I can run my cucumber-jvm / Appium tests, copy the logcat file after the test execution completes, parse it for relevant information, and do appropriate assertions on the same.

The default buffer size on Android devices I have seen is 256kb. This is less for me - as I end up losing the earlier information, and hence my assertions fail.

Thankfully, there is a programmatic way to change the logcat buffer size in the device before running tests. The command is

adb logcat -G 3M

This adb command works in the Motorola devices in my MAD LAB, but does not work in Samsung devices. The error I see on running the above command is "failed to set the log size"

Any idea why this would not work in Samsung devices? or rather, what do I need to do to change the logcat buffer size?

[UPDATE] - Interestingly - this works on Samsung Galaxy S7, but NOT in Samsung J5 Prime OR Samsung J7 Prime

Monday, February 20, 2017

Sharing implementation of cucumber-jvm - Appium test framework

I recently shared the Features of my Android Test Automation Framework and also the challenges, and, how we overcame those, to make the parallel test execution work well with Android 7.0 devices as well.

In this blog post, I will be sharing the details (including code) of the implementation. If you have not read my post on - 
Features of my Android Test Automation Framework - I highly recommend you read that first.


Implementation Details

Tech Stack Summary

To recap - here is the tech stack that we currently have:
  • cucumber-jvm - v1.2.5
  • cucumber-reporting - v3.5.1
  • appium - v1.6.3
  • appium-java-client - v5.0.0-BETA2
  • appium-uiautomator2-driver - v0.2.3

1. Configure Jenkins Node (in Jenkins Server)


We currently have 5 Jenkins Nodes setup as shown below.


Each node is configured like this:


2. Setup Jenkins Job (in Jenkins Server)

Once the Nodes are setup, we can now configure the Jenkins Jobs. 


We have setup the following jobs in Jenkins for our test executions.


Each job is configured as a Jenkins Pipeline Project and we use the the Jenkins file available here (https://github.com/anandbagmar/cucumber-jvm-appium-infra/blob/master/2%20-%20Setup%20Jenkins%20Jobs/2.2%20Jenkinsfile) as a sample from git to configure what the job is supposed to do.


3. Setup Jenkins Agent

Once the Jenkins Nodes and Jenkins Jobs are configured, we now need to get the Jenkins Agents itself setup and configured to be able to service the requests from the Jenkins server.


We use the JNLP way to connect the Jenkins Slave to the Jenkins server. For this, we have a template .sh script, which we need to copy and update 2 values in it. This is needed for each new Jenkins Node that we connect.

The template .sh script can be found here (https://github.com/anandbagmar/cucumber-jvm-appium-infra/blob/master/3%20-%20Setup%20Jenkins%20Agent/3.1%20start-e2e-moto.sh).

Now, our Jenkins setup is done. But a big piece is still missing. 

In order to run our tests on the Agent, we need some basic software to be installed. To do this, we created a shell script, that will help provision the machine. This is required to be done just once - but we do plan to have multiple Mac Mini host machines that will run various number of Jenkins agents - so the script will help keep same software (including version) on our machines - which means the same test execution environment.

This shell script can be found here - (https://github.com/anandbagmar/cucumber-jvm-appium-infra/blob/master/3%20-%20Setup%20Jenkins%20Agent/3.2%20JenkinsAgentMachineFirstTimeSetup.sh)


4. Manage Test Infrastructure & Test Execution

By this stage, our Jenkins Server, Jenkins Agent setup is done, including the software required to run the tests. Next thing is now at the Test Framework level.


Our build tool is gradle. All infrastructure related work is handled via this build.gradle file. 

Before we get into the details of the gradle file, it is important to understand what the code structure is.


Via groovy / gradle, we managed to solve the complexity of:

  • Finding matching devices based on the CONNECTED_DEVICE_IDS
  • Downloading the apk file from where ever it is available
    • This is done just once per test run - regardless of how many devices the test is going to run on
    • The URL to download is passed as an environment variable - APP_URL
    • For local testing, you can give a local absolute path to the apk file via the APP_PATH environment variable instead of specifying APP_URL
  • Finding the list of scenarios to be run (based on the cucumber tags specified via the environment variable - 'run'
  • Managing start / stop of Appium Servers
  • Cleaning up the device before test runs
  • Executing Cucumber scenarios in parallel
  • Building consolidated reports locally (cucumber-reports) - IF not using the Jenkins cucumber-reports plugin


5. Run Tests

Last, step in this process - is to manage the Android Driver. We use the Cucumber-jvm's @Before and @After hooks to set the right capabilities for instantiating the AndroidDriver, and also stopping the same after test execution is complete.


These helper files can be found here (https://github.com/anandbagmar/cucumber-jvm-appium-infra/tree/master/5%20-%20Run%20Tests).


Sample Code

All the sample code can be found from my github repository cucumber-jvm-appium-infra - https://github.com/anandbagmar/cucumber-jvm-appium-infra


Happy Testing!


Tuesday, February 14, 2017

Features of my Android Test Automation Framework

[UPDATED - Added link to implementation details at the end of the post]

As I have shared in my previous few blog posts (A new beginning - entertainment on mobile, How to enable seamless running of appium tests on developer machines?), a few months ago, I embarked on a new journey as "Director - Quality" for the Viu product at Vuclip.


Here are a few details about our Viu app:
Viu offers high quality, popular, regional video content in various different languages for consumers in various different regions - Indonesia, Malaysia, India, Middle-East, Egypt ....
The consumers on the move could be using Android devices or iOS devices to watch their favourite content - either stream it directly via their Mobile Data plan, or they could have downloaded their preferred video at home / office and watch the saved video later.
The very interesting, and, challenging bit from Testing perspective, is that the app would behave differently based on from which part of the world the user is using it. This logic is not based on Geolocation.

Objective

My objective from functional test automation is:
  • Get quick feedback, from every build and know if the app is working well. If NOT, then be able to get to the root cause ASAP.
  • Provide feedback and confidence to stakeholders (Product team, Business team, etc.) on the "true" state of the product. There should be no surprises, for anyone!
  • Run tests seamlessly by simulating different regions

Approach

To achieve this - I choose to go with the following tech-stack:
  • Test Intent specification - cucumber-jvm - to specify the business intent, in the business terminology (expected to be) understood by all.
  • Reports - cucumber-reports provide good, rich, meaningful and easily understandable reports which provide meaningful information about the state of the product.
  • Device interaction - Appium / Java - implement the intent specified by cucumber-jvm. This will also allow us the flexibility to test against Android, iOS and Web.
  • Continuous Integration (CI) server - Jenkins - to be able to run tests automatically when a new build is ready. Also, we integrated the cucumber-reports via the cucumber-reports plugin directly in Jenkins - so now all stakeholders interested in the reports just need to go to one place and get all information, in real time. No more need for Test Reports to be generated manually and sent across for everyone.

Test Execution environment

I looked at various cloud-based service providers (SauceLabs, Test Object, pCloudy, AWS Device Farm, etc.) who could run our tests on real-devices in their data centers. These tests would need to be triggered automatically via Jenkins when a new build (apk) is available, or as we add more tests. However, none of these providers could satisfy my requirements (without having to compromise significantly on my objectives).

Hence, finally decided to setup my own private Test Lab for this. Oh fun!

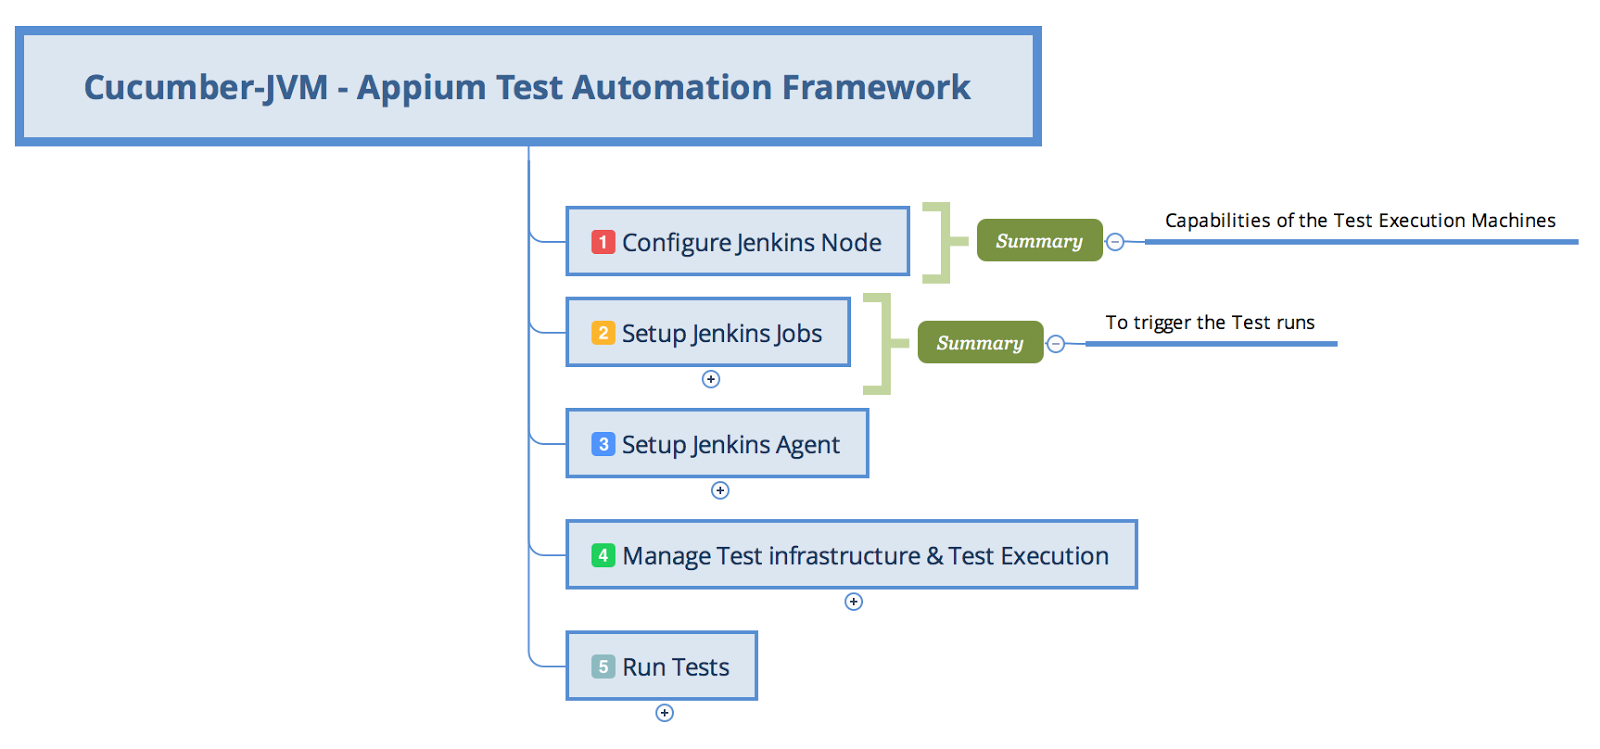
Framework Architecture

Below is the architecture of the framework that I came up with. This is based on the architecture I posted in my earlier blog post on “Assertion & Validations in Page Object” (https://essenceoftesting.blogspot.com/2012/01/assertions-and-validations-in-page.html)
ViuTestFrameworkArchitecture.png

Approach, Features & Capabilities of the Test Lab

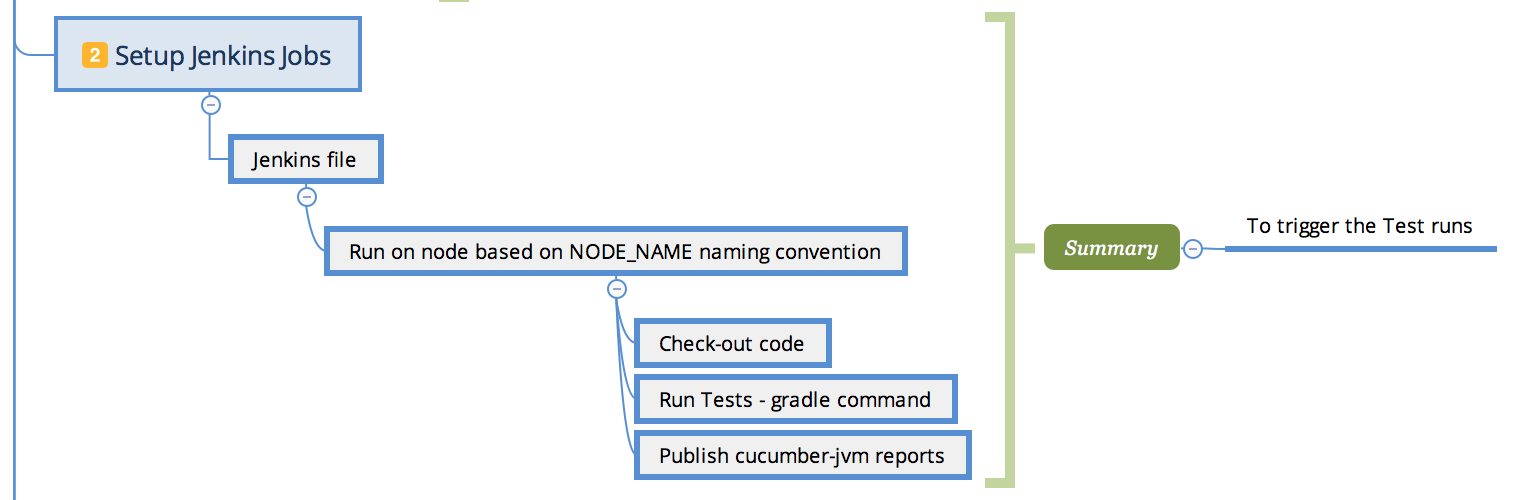
  • For Jenkins configuration, we configure the job using Jenkins file - to ensure our Jenkins configuration is also under version control. Also, since this is groovy scripting language, we can have good logic and processing done as part of the job execution.
  • This helped us keep the configuration consistent and common across any type of job we had to run.
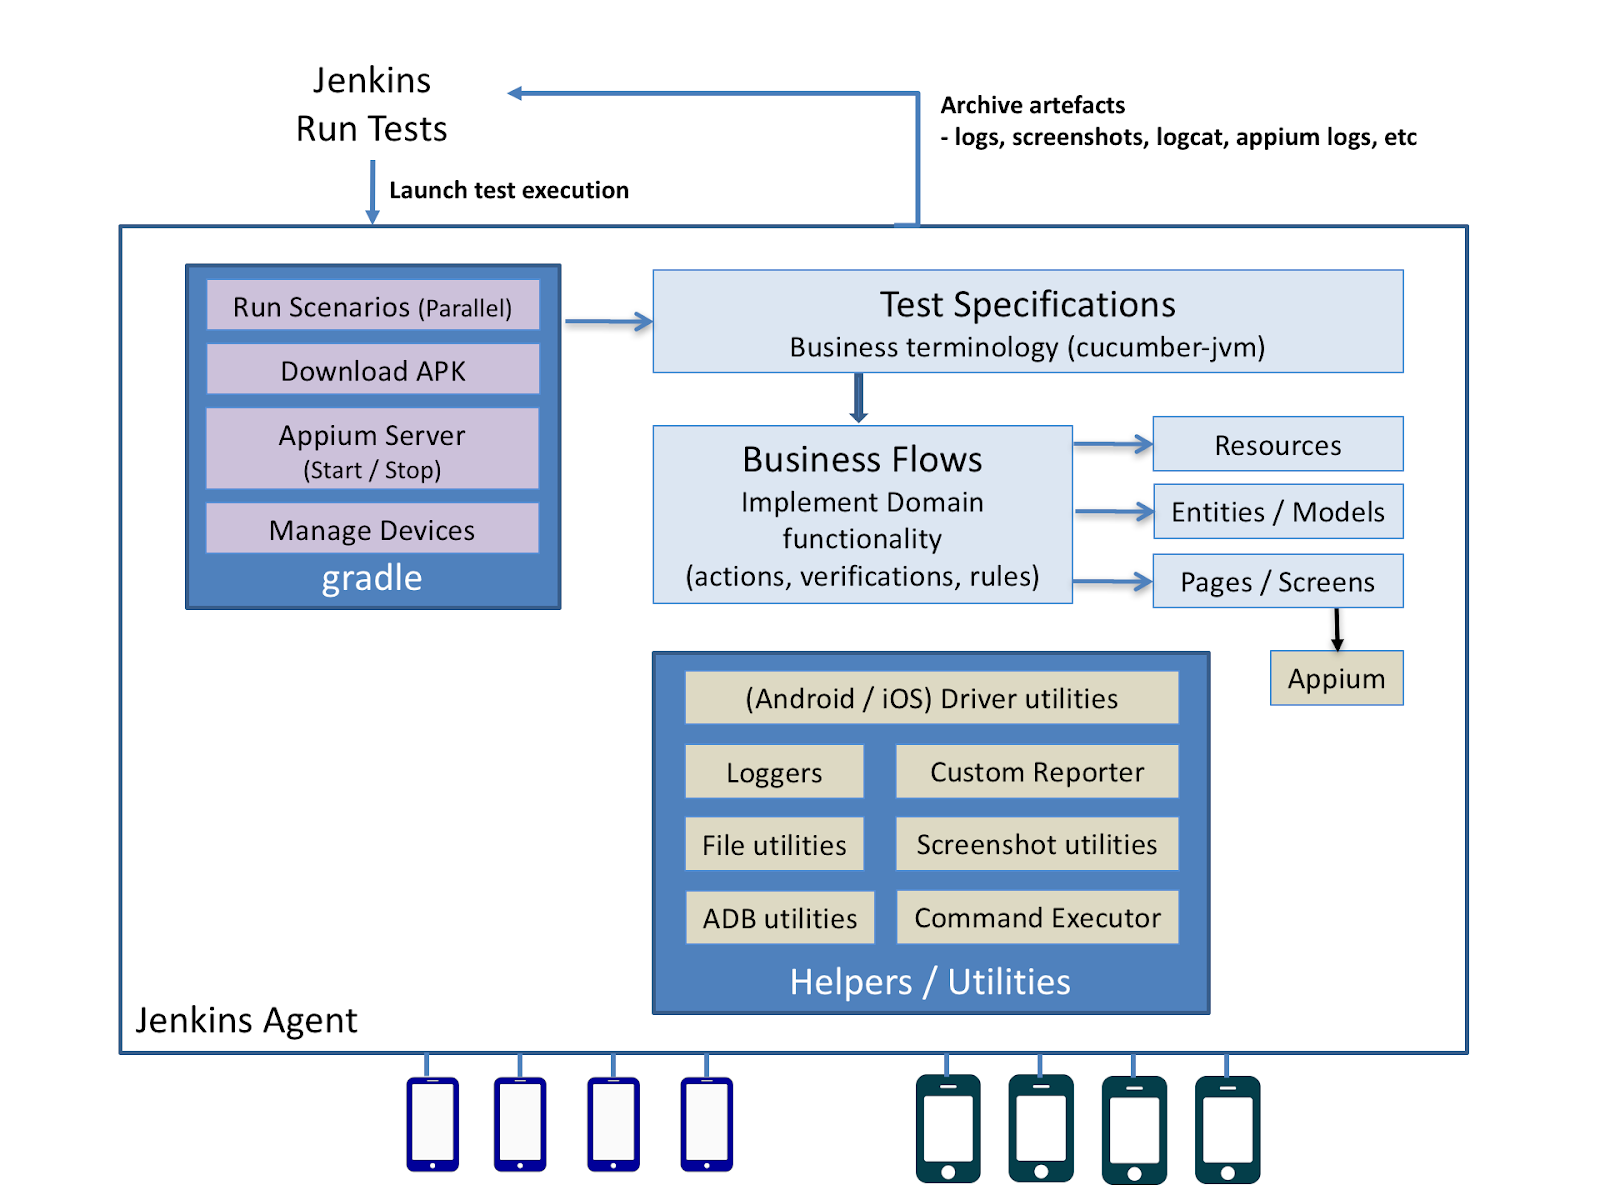
  • The Jenkins job will trigger a set of commands on the Jenkins Agent.
  • Jenkins Agents are setup on Mac Mini machines. Each Agent has only 1 executor. This is essential to prevent using a device that is already in use by another job / executor / agent.
  • The Mac Mini (more to be added on demand) has a powered USB hub which connects upto 8 devices
  • Depending on types of devices connected, we have as many Jenkins Agents (with 1 executor only) allocated for them.
Example:
    • Samsung devices (with API Level 22) allocated to Jenkins agent - viu-e2e-samsung
    • Motorola devices allocated to Jenkins agent - viu-e2e-moto

Infrastructure

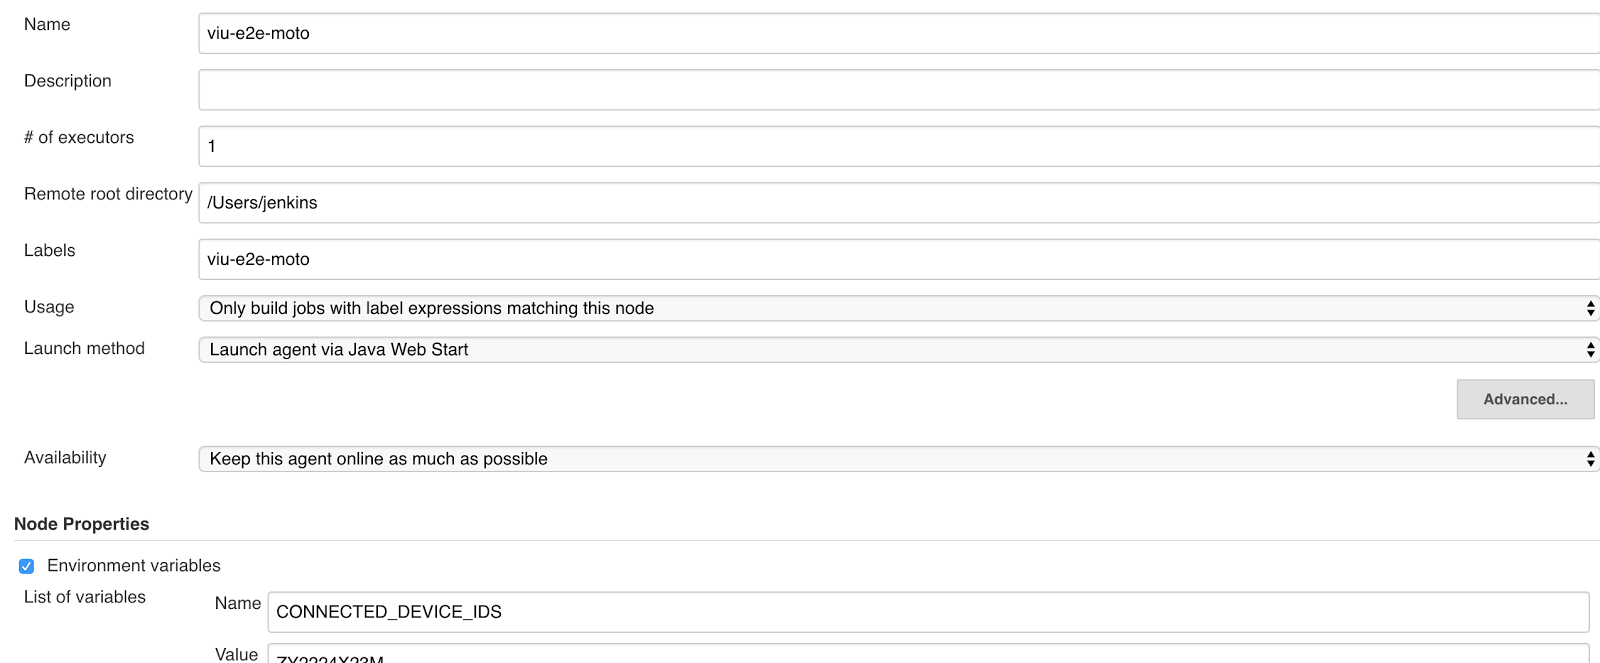
  • To manage and use the devices allocated to each node and more important - prevent other nodes using other devices, each node in Jenkins has an environment variable in its configuration - CONNECTED_DEVICE_IDS - a comma separated list of devices allocated to this node.
    • This approach makes it easy to change / add / remove devices on the fly. All we need to do in such cases is update the device ID in the appropriate node’s CONNECTED_DEVICE_IDS environment variable
    • Our gradle file, reads the CONNECTED_DEVICE_IDS environment variable, and finds devices connected on the Mac Mini matching the provided device ids. This simple technique allows specific device allocation from the pool of devices to each node.
    • PS: If anyone does an error and provides the same device id for multiple nodes, we all know what will happen. These are areas where we need to be very cautious in our execution and maintenance.
  • The URL for the Android APK file is also passed to the gradle file as a an environment variable. We download the APK file once before test execution starts.
  • Functional (end-2-end) Automation is painfully slow to run. To get the feedback quickly, we have to run this in parallel. All existing approaches to running cucumber-jvm tests in parallel failed to meet our requirement. I wanted to run each scenario in parallel, on whichever device is free (from the matching devices list). Eventually ended up writing a small script that allows me to run scenarios in parallel.
  • Managing Appium Server (start / stop) is another important activity - which is required to be done just once per device. Gradle manages that as well.

Next steps

  • Stabilize parallel test execution (problems with Android 7)
  • Start with iOS app automation
  • Start with Web automation (www.viu.com)
  • Share gradle file with community, if anyone interested.
  • [UPDATED] You can find the details of the implementation here